On this page:
- Introduction to Drupal theming
- Setting up a Drupal development environment
- Understanding Drupal's theme structure
- Starting your custom theme project
- Drupal theme file structure
- Twig templates in Drupal
- Adding CSS and JavaScript to Drupal themes
- Overriding Drupal core templates
- Implementing responsive design in Drupal themes
- Best practices for Drupal theming
- Tips for debugging Drupal themes
- Drupal theme optimization for performance
- Drupal accessibility features in theming
- Integrating third-party libraries into Drupal themes
- Drupal theming security considerations
- Theme settings and configuration options
- Custom block types and theming
- Theming forms in Drupal
- Multilingual theming for Drupal sites
- Updating and maintaining custom drupal themes
- Conclusion

Introduction to Drupal theming
Overview of Drupal as a content management platform
Drupal is a robust content management platform known for its flexibility and scalability. When it comes to theming, Drupal provides a powerful foundation that allows developers to create highly customisable and unique websites. This is facilitated by its theme layer, which handles the presentation of the website, giving developers the tools to define how content is displayed.
Importance of theming in Drupal websites
Theming is crucial in Drupal websites because it directly affects how users interact with the content. A well-thought-out theme can enhance user experience, improve accessibility, and ensure the site’s aesthetic aligns with its brand identity. It’s not just about looks; effective theming improves site navigation and functionality, making the website more intuitive and user-friendly.
Briefing on the flexibility of Drupal theming
Drupal theming is remarkably flexible, allowing developers to override the default presentation settings and create bespoke layouts and styles. This flexibility means that virtually any design can be translated into a Drupal theme, whether you are building a simple blog or a complex corporate website. With Drupal, the possibilities are vast, enabling developers to implement innovative design solutions that meet specific project requirements.
Setting up a Drupal development environment
Requirements for starting a custom theme development
To start developing a custom theme in Drupal, you'll need a few essentials. First, ensure you have a basic understanding of HTML, CSS, and PHP, as these languages are foundational to Drupal theming.
You'll also need to install itself.
Additionally, access to a code editor like Visual Studio Code, PHPStorm or Sublime Text, and a local server environment are essential for writing and testing your code.
Step-by-Step guide to setting up a local development environment
Before proceeding, you’ll need to have the following installed locally (follow the links for installation steps for your OS:
Setting up a local development environment is crucial for Drupal theming. One of the easiest tools for managing a local Drupal environment is DDEV, an open-source tool that simplifies the setup process using Docker containers.
Here’s how to set it up:
1. Install Drupal with composer: In the directory where you want to install Drupal, run this command from your terminal:

Here, “drupaldemo” will be the name of the docroot folder.
This will download all of the Drupal files for the latest Drupal stable release.
2. Setup DDEV: Inside the “drupaldemo” directory, run “ddev config”.
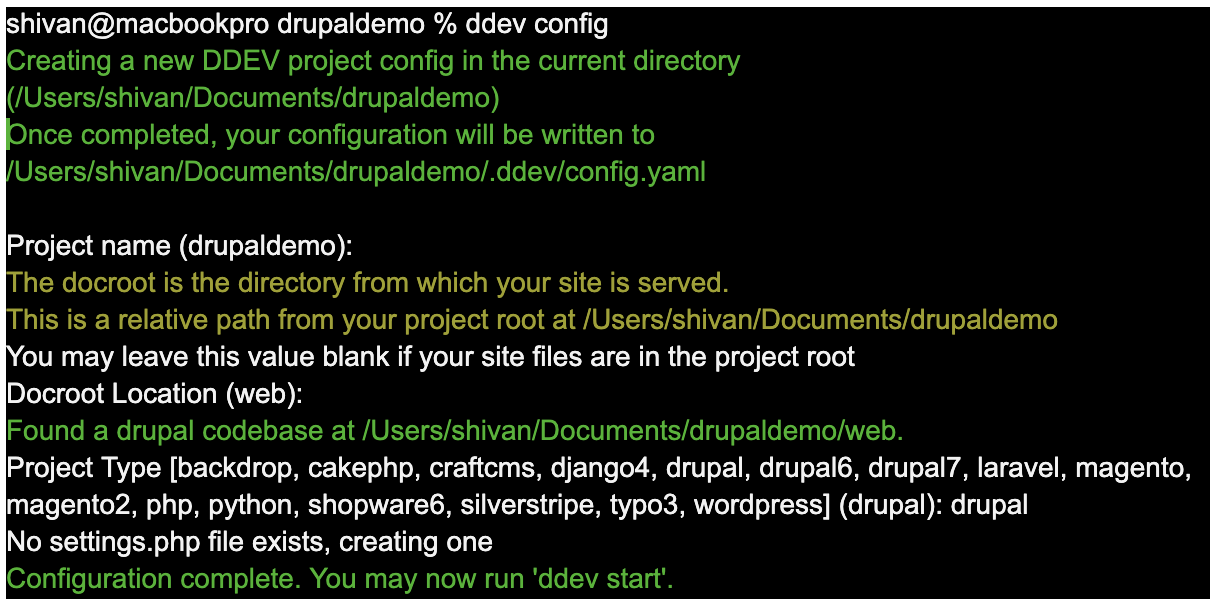
This command starts the configuration process where you can specify the project name and the document root.
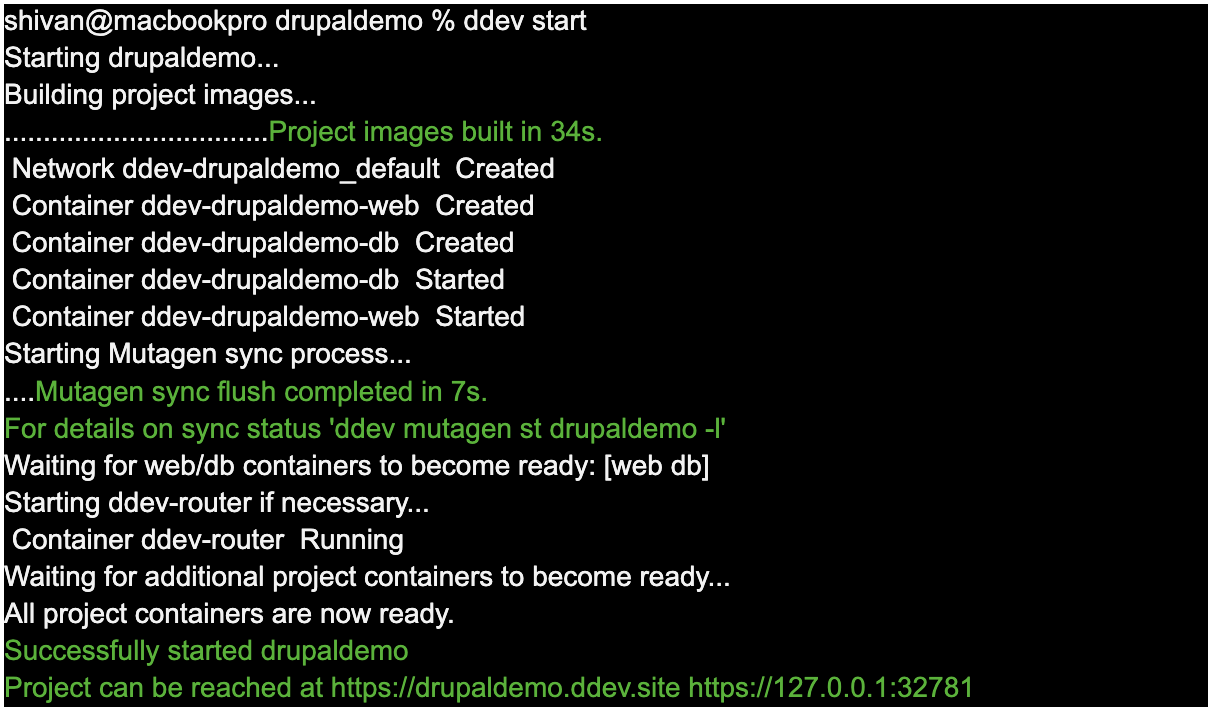
3. Start DDEV: In the “drupaldemo” directory, run 'ddev start' to launch the environment.
This command will set up everything needed to run Drupal locally, including an Apache/Nginx web server, a PHP interpreter, and a MySQL database.
4. Install Drupal: Once the environment is running, visit the provided DDEV URL in your browser to install Drupal using the standard installation process.
The URL, in this case, will be:
When you visit the URL, you should see this:
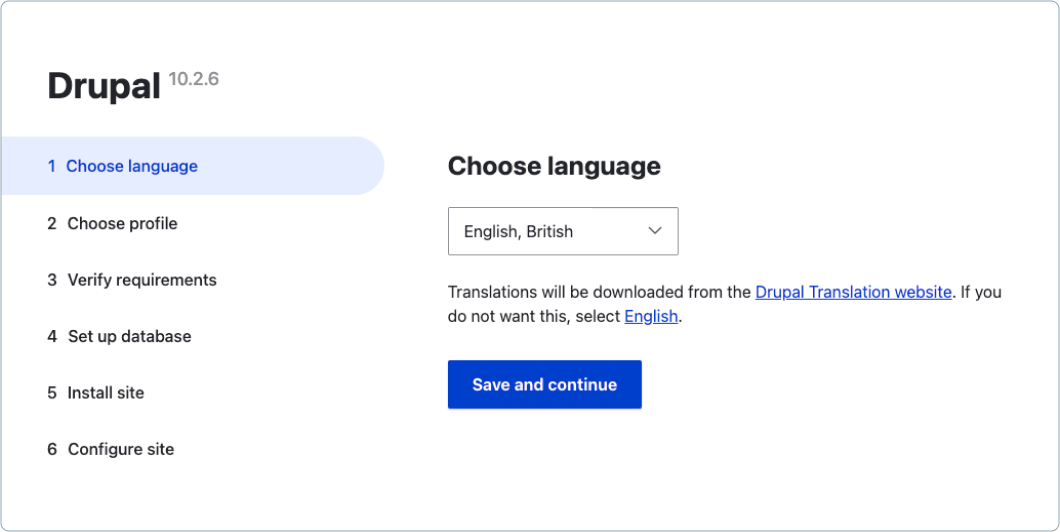
Follow through with the steps to complete the installation.
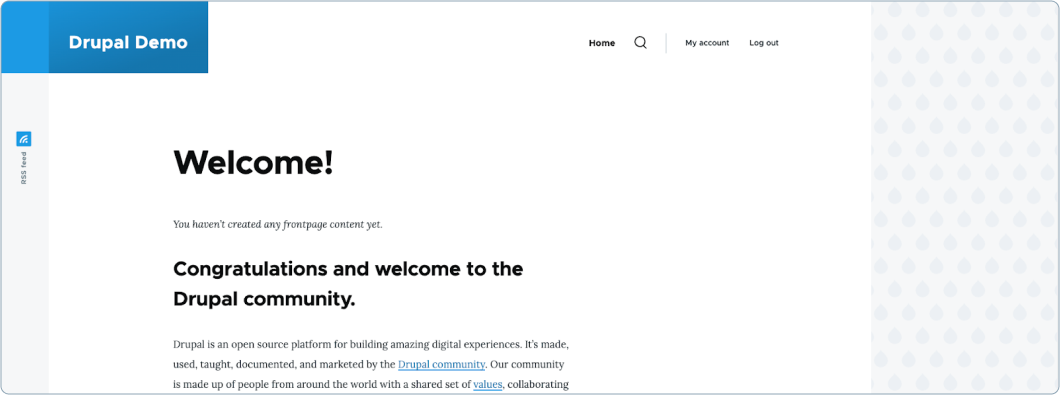
Upon completion, you should see the default Drupal homepage:
Importance of a proper development workflow
A proper development workflow is vital to ensuring efficient and error-free theme development. Using a local development environment like DDEV allows you to develop and test themes in a controlled, repeatable manner. Version control systems such as Git are also essential for managing changes to your theme code.
This approach not only backs up your work but also makes it easier to collaborate with others. Ensuring you have a robust workflow in place minimises the risks associated with direct changes to live sites and helps maintain consistency across different development stages.
Understanding Drupal's theme structure
Explaining the hierarchy of theme files
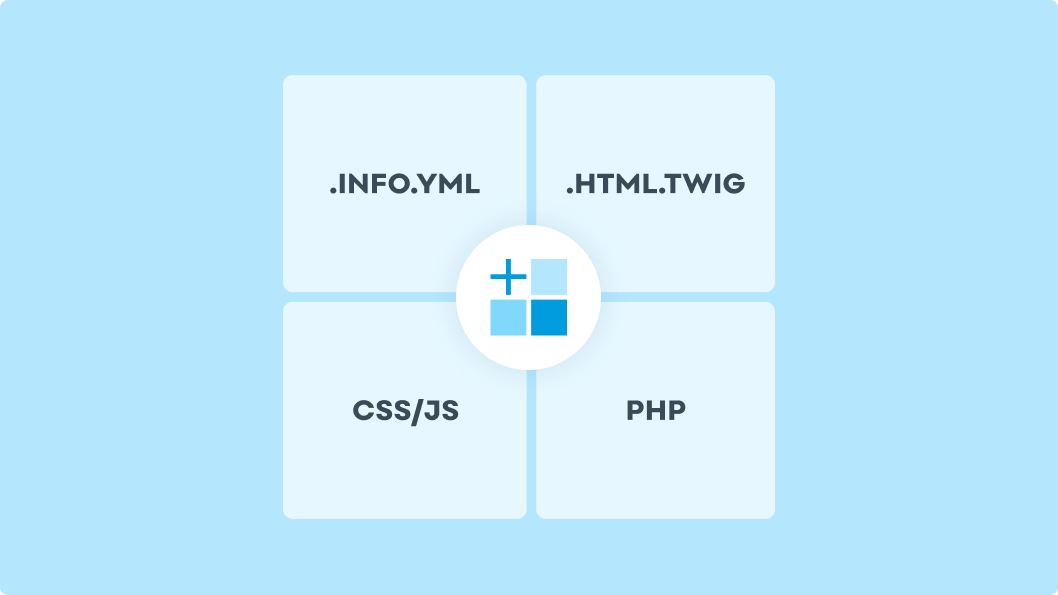
Drupal's theme structure is designed to be flexible and hierarchical, allowing for extensive customization. At its core, a Drupal theme consists of several types of files, each serving a specific purpose:
1. .info.yml File: This is the heart of any Drupal theme, containing metadata about the theme and defining libraries, regions, stylesheets, scripts, and dependencies.
2. Twig Template Files: These are the templates that control the HTML output for different parts of your Drupal site, such as pages, nodes, blocks, and fields. Twig files end with the '.html.twig' extension.
3. CSS/JavaScript Files: These files add styling and interactive functionality to your theme. They are often organised in libraries defined in the .info.yml file, allowing you to control when and where each file is loaded.
4. PHP Files: Including 'theme-settings.php' or '.theme' files, these contain logic to preprocess variables and alter render arrays before they reach your Twig templates.
The hierarchy of these files in Drupal is crucial as it determines which template or style is applied based on specific conditions, such as the content type or user role.
The Role of base themes and sub-themes
In Drupal, base themes and sub-themes provide a powerful way to leverage existing designs and functionality while adding customizations. A base theme is a complete theme used as a starting point for other themes; it includes basic styling and behaviour that can be extended or overridden.
A sub-theme inherits resources from its base theme, allowing developers to make specific changes without redoing everything. This is particularly useful when you want to maintain consistency across multiple sites or when you need to upgrade the base theme without losing customizations.
Popular base themes such as Barrio Bootstrap offer extensive documentation and community support, making them ideal for many projects.
Core vs Contributed vs Custom themes – When to choose which
Core Themes: These themes come with Drupal and are fully supported by the Drupal core team. They are generally very stable and well-integrated with core modules and features. Core themes are a good choice if you need high compatibility and straightforward requirements. Typically, core themes are the best candidates for the Drupal administrative backend.
Contributed Themes: These themes are developed and shared by the Drupal community. They often offer more specialised features or designs compared to core themes.
Contributed themes can be perfect when you need a theme that's already tailored towards specific functionality or aesthetic requirements.
Custom Themes: Custom themes are the best choice when your site requires a distinctive look or specific features not available in pre-existing themes. They are also ideal for ensuring that the theme perfectly aligns with corporate branding guidelines.
The choice between core, contributed, and custom themes depends on your project's scope, budget, and specific needs. Evaluating the trade-offs between development time, cost, and customization will help you make the best decision for your Drupal project.
In this article, we will set up a custom theme.
Starting your custom theme project
In Drupal, you just need at least 1 specific file to create a custom theme. This file is THEMENAME.info.yml
Here, “THEMENAME” is the machine name of your theme, which is also the name of your custom theme folder.
In our example, and for the rest of this article, we will name our custom theme “panda.”
Let’s set this up.
Create a folder in docroot/web/themes. Name this folder “custom”. Typically, in Drupal, we place all custom themes in a folder named “custom”. This is good practice but not absolutely necessary. The final folder structure should look like this:
docroot/web/themes/customCreate another folder inside the custom folder and name it “panda”. Here “panda” is the name of the theme. It’s good practice to keep the name short and simple and avoid any special characters because this will be the machine name of our theme. The machine name will be used throughout the code in the custom theme. Now the folder structure looks like this:
docroot/web/themes/custom/pandaCreate panda.info.yml inside of the “panda” folder. The name of the .info.yml file has to match the folder's name exactly and is case-sensitive. Now the file exists like this:
docroot/web/themes/custom/panda/panda.info.ymlInside of panda.info.yml, paste the following:

These are the minimum required text to set up a Drupal custom theme. For a full listing of key value pairs that you can add, see .
Here is an explanation of each of the key pair values:
name - The human readable name of your custom theme
type - The type of extension. Values can be “theme”, “module”, or “profile”. As we are creating a custom theme, it should be set to “theme”.
core_version_requirement - Allows your custom theme to specify that they are compatible with multiple major versions of Drupal core.
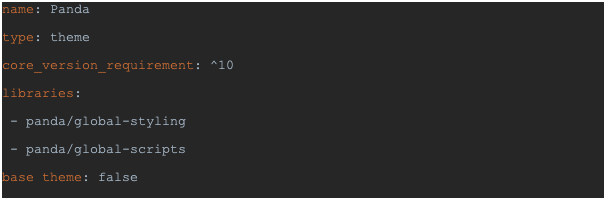
base_theme — If set to the machine name of another theme (like Barrio ), your custom theme will inherit the resources from that theme. Examples of resources can be JS, CSS, libraries, templates and regions, all of which come from the parent theme. If set to false, no base theme will be used, and nothing is inherited.Clear the Drupal cache by going to the following URL:
Now go to , and you should see your new custom theme. Click on “Install and set as default”.
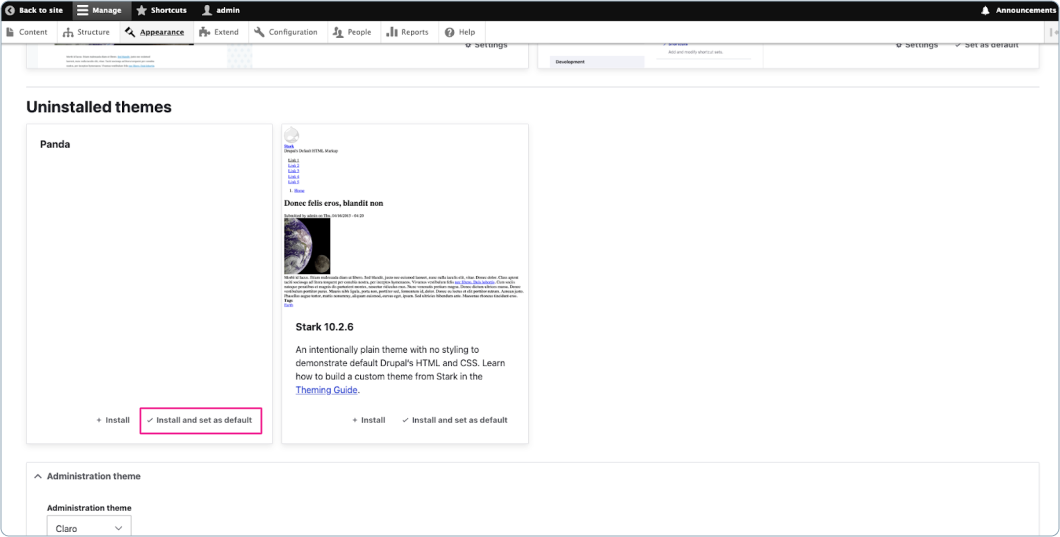
Congratulations! You have now created a custom Drupal theme!
Drupal theme file structure
For your custom Drupal theme, here's a typical file and folder structure that outlines where your theme's files and directories would be organised within your Drupal installation:
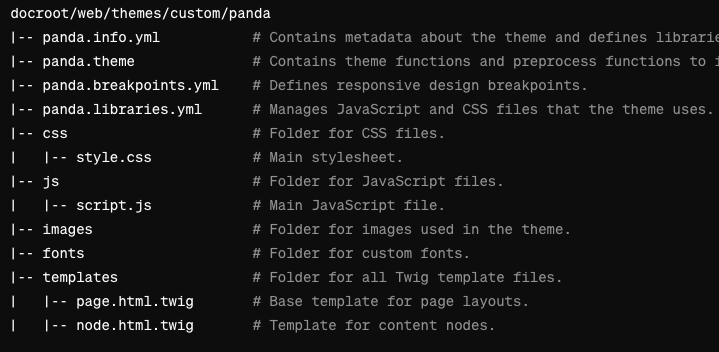
Explanation of Key Files and Directories:
panda.info.yml: This YAML file contains essential information about the theme, such as its name, description, core version, and dependencies. It also defines regions (like header, content, footer) and libraries.
panda.theme: This PHP file includes logic to preprocess variables and alter arrays before they are used in templates. It's where you can write your own functions to override default behaviours and manipulate data.
panda.breakpoints.yml: Manages media queries for responsive design, allowing you to define points where your site's layout should adjust to accommodate different screen sizes.
panda.libraries.yml: Controls all static resources (CSS and JavaScript). You define libraries here, specifying which resources are added globally or under certain conditions.
css/style.css: Holds the main CSS rules for styling your theme. You might also include additional stylesheets for specific components or page types.
js/script.js: Contains JavaScript that adds interactive features to the theme. This might include behaviours like sliders, modal dialogs, or dynamic content loading.
images: This directory stores images used across the theme, such as backgrounds, icons, and logos. There are NOT end user uploaded images. These are static images like backgrounds.
fonts: Contains custom font files that you might need beyond what's available from standard web fonts.
templates: This directory is crucial for theming, as it holds all Twig template files. These templates determine how markup is output by Drupal. Common templates include those for individual pages, nodes, blocks, and fields.
This structure provides a solid foundation for developing a highly customised and maintainable Drupal theme.
Twig templates in Drupal
What is Twig, and why does Drupal use it for theming
Twig is a modern, flexible, and fast templating engine for PHP, which Drupal uses for its theming layer. The choice of Twig for Drupal theming brings several benefits:
Security: Twig automatically escapes variables, protecting your site from common security vulnerabilities like XSS (Cross-Site Scripting).
Simplicity: Its syntax is clean and easy to learn, which makes it more approachable for front-end developers and designers.
Performance: Twig is designed to be fast, compiling templates down to optimised PHP code for quicker execution.
Extensibility: With Twig, you can create custom filters, functions, and extensions, allowing for powerful and reusable template logic.
By using Twig, Drupal ensures that theming is both secure and efficient while also empowering developers to create highly customisable and maintainable designs.
Creating Twig template files for custom styling
Creating custom Twig templates in Drupal allows you to define how different parts of your site should be rendered. For example, if you want to create a custom template for the front page, you would create a 'page--front.html.twig' file and drop it into the templates folder.
Here's how to create and customise a Twig template for the front page:
1. Create the template file: In your custom theme's templates folder, create a file named 'page--front.html.twig'.
2. Add custom markup and logic: Open 'page--front.html.twig' and add the following custom HTML and Twig logic.
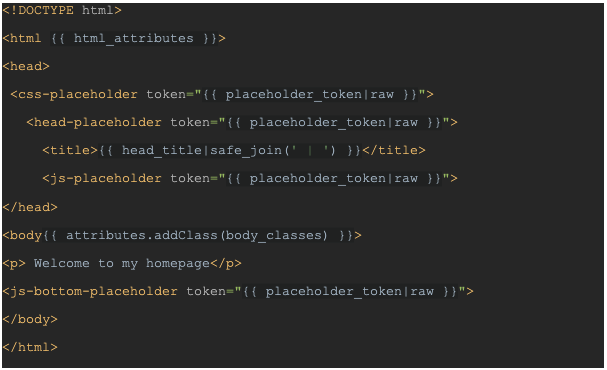
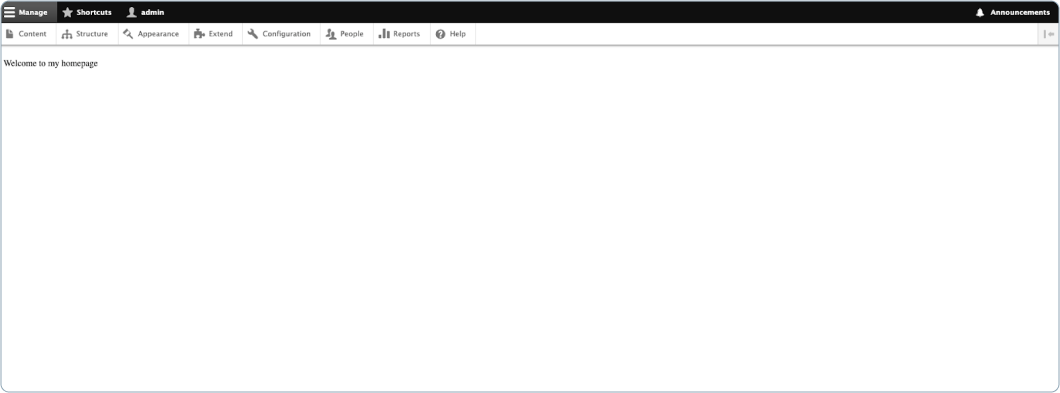
Clear the Drupal cache again and visit your homepage. It should look like this:
As you can imagine, the above template code is just a simple example to get you started. There are infinite customisations that you can achieve by customising your template.
Tips on learning Twig syntax and functions
To effectively use Twig in Drupal theming, here are some tips:
1. Explore the official documentation: Start with the Twig , which provides comprehensive guides on syntax, filters, and functions.
2. Use Drupal’s Twig debugging: Enable Twig debugging in your Drupal site's ‘services.yml’ file. This will allow you to see which templates are being used by inspecting the page's HTML code.
To set this up, create a new file names services.yml, place it in docroot/web/sites/default and then paste the following code:

Now clear the Drupal cache, refresh the homepage and look at the HTML code.
You should now see HTML comments such as this:
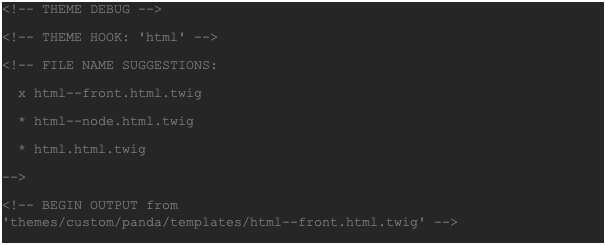
The above code tells you a few things:
- exactly which template is being used for the current page (in this case html–front.html.twig as can be seen by the “x” next to the name)
- All the other possible template names that you can create to override the layout of this page
- The file path of the current template being used
3. Leverage Drupal's theming guide: The Drupal Theming Guide is an excellent resource for understanding how to use Twig within the context of Drupal.
4. Practice with examples: Create simple templates and gradually add complexity as you become more comfortable with the syntax and functions. You can look at some of the templates from the Drupal core themes, which can be found in docroot/web/core/themes
5. Join the community: Participate in Drupal Slack forums and join communities where you can ask questions and share knowledge with other developers.
By leveraging these resources and practices, you'll quickly become proficient in using Twig to create powerful and dynamic Drupal themes.
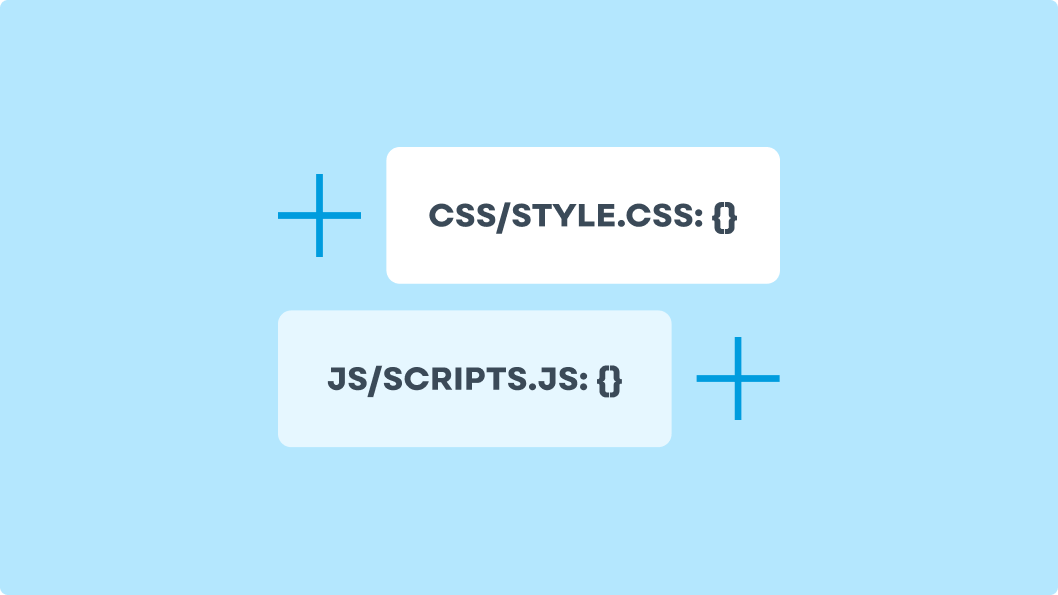
Adding CSS and JavaScript to Drupal themes
Best practices for including CSS and JS in your theme
When adding CSS and JavaScript to your Drupal theme, it's important to follow the Drupal best practices to ensure performance, maintainability, and scalability.
Depending on your use case, there are multiple ways to add CSS and JS to your theme. We’ll walk you through each of these ways.
Using libraries
Define and manage your CSS and JavaScript files through a ‘.libraries.yml’ file. This ensures that assets are only loaded when needed, improving site performance.
Using libraries in Drupal involves creating a '.libraries.yml' file in your theme's root directory. This file defines which CSS and JS files are included in your theme and allows you to manage dependencies and attributes.
Here’s an example of how to define a library in your theme:
1. Create the '.libraries.yml' File: docroot/web/themes/custom/panda/panda.libraries.yml
2. Define the Library:
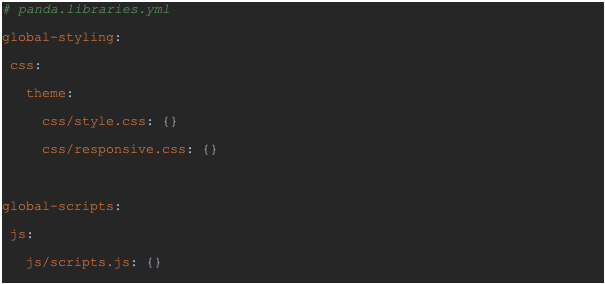
3. Attach the Library in Your '.info.yml' File:
This setup ensures that the CSS and JS files are properly loaded on every page where the theme is active.
What if you only wanted to load libraries on pages only where it is needed? That brings us to the next way to conditionally load JS and CSS in your Drupal theme.
Leverage Drupal’s asset management
Use Drupal's built-in asset management system to control when and where your assets are loaded. This helps prevent unnecessary resource loading, which can slow down your site. If done correctly, CSS and JS files will be loaded on pages only where they are needed.
For example, if a specific script is only used on the front page, ensure it is only loaded there.
To do this, edit your panda.libraries.yml file to add the script reference:

Then, attach the library to your 'page--front.html.twig':

In the above, “panda” is the name of your theme and “front-page-scripts” is the name of your library as you defined it in the libraries.yml file. You can add more than one JS/CSS file to a library.
Libraries can be attached to all , a Twig , or a subset of .
For more detailed information, refer to the Drupal documentation on adding .
Minimise and aggregate files
Use minimised versions of your CSS and JS files to reduce load times. Drupal can aggregate and compress these files, further enhancing performance.
1. Optimise assets: Use tools like or to automate tasks such as minification and concatenation of your CSS and JS files. This reduces the number of HTTP requests and file sizes, speeding up your site.
2. Use modern standards: Follow CSS and JavaScript coding standards to ensure your code is maintainable and scalable. This includes using proper class naming conventions, avoiding inline styles, and writing modular and reusable code.
Avoid inline styles and scripts
Place your styles and scripts in external files or libraries rather than inline in your twig templates. This improves caching and keeps your code organised.
By following these best practices and using Drupal's library management system, you can effectively manage your theme's assets, ensuring high performance and maintainability.
Overriding Drupal core templates
How to identify and override existing templates
In Drupal, a single page can have multiple theme suggestions, which are candidate templates for rendering that page. Drupal determines which template to use based on a priority order. For example, if you're theming a node page, Drupal might look for templates in this order: 'node--type--view-mode.html.twig', 'node--type.html.twig', 'node--view-mode.html.twig', and finally 'node.html.twig'.
To identify which template Drupal is using to render a specific element on your site, you can enable Twig . Twig debugging provides valuable information about the templates being used, their suggestions, and the template files themselves.
Creating template suggestions for custom layouts
To create custom template suggestions for your theme:
1. Copy the default Twig template you want to override from Drupal core or contributed modules into your theme's templates directory.
2. Rename the copied file according to Drupal's template naming conventions. For example, to override the node template for a specific content type, you would name the file 'node--content-type.html.twig'.
3. Make your desired changes to the copied template file.
Please see Drupal’s documentation on Twig naming for a more detailed understanding, as it’s quite complex and somewhat hard to grasp for newcomers to Drupal.
Preprocess functions and their role in theming
Preprocess functions in Drupal allow you to manipulate variables before they are passed to Twig templates, providing a way to add logic and customise the rendering of elements.
You would use preprocess functions to:
- Alter variables before they are rendered in a template.
- Add new variables to templates.
- Perform complex logic that is not suitable for Twig.
Here's an example of how to use a preprocess function to add a variable to a template:
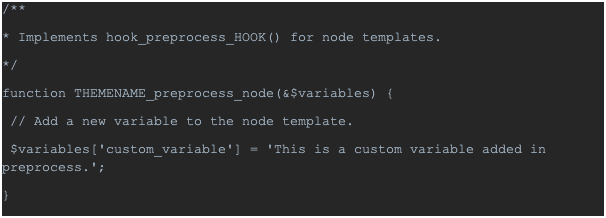
Replace “THEMENAME” with the machine name of your theme, which is “panda” in our case.
So, the final code would look like this:
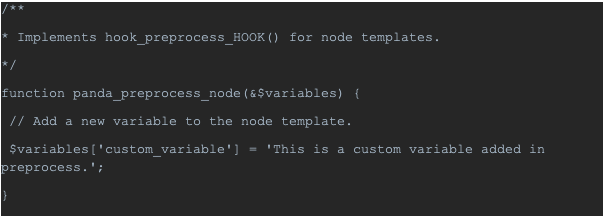
In your Twig template ('node.html.twig'), you can then access this variable like so:
To determine the correct preprocess function to use, you typically follow a naming convention:
'hook_preprocess_HOOK()' where 'HOOK' is the name of the template being preprocessed. For example, 'hook_preprocess_node()' preprocesses variables for node templates.
The first ‘hook’ is usually your custom theme name.
S, to use this hook, you would name your function: ‘panda_preprocess_node’
You can find the appropriate preprocess function by consulting Drupal's documentation or using a debugger like Xdebug to inspect available variables.
Implementing responsive design in Drupal themes
Importance of mobile-first design and cross-browser compatibility
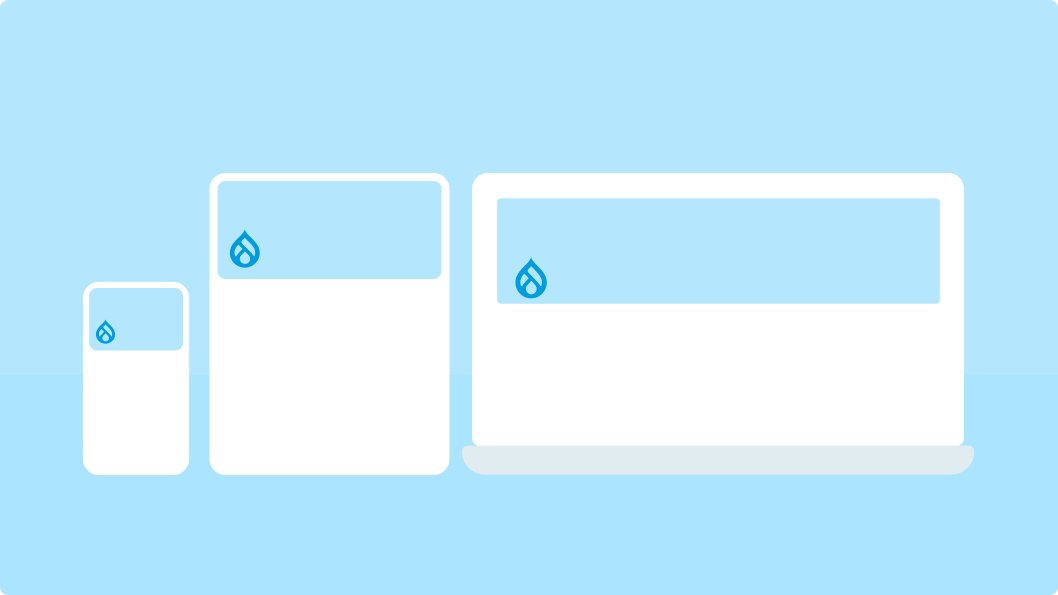
In today's digital landscape, mobile-first design and cross-browser compatibility are crucial for ensuring a positive user experience. A mobile-first approach prioritises designing for smaller screens first and then scaling up for larger screens. This ensures that essential content and functionalities are accessible on mobile devices, which are often the primary way users access websites. Cross-browser compatibility ensures that your site looks and functions correctly across different web browsers, providing a consistent experience for all users.
Techniques for making your theme responsive
Making your Drupal theme responsive involves several key techniques:
1. Fluid grid layout: Use percentage-based widths rather than fixed pixel widths to allow your layout to adapt to different screen sizes.
2. Responsive images: Use Drupal’s responsive image styles to create different styles for different breakpoint widths.
3. Media queries: Utilise media queries to apply different styles at various screen sizes. This allows you to tailor the design for different devices.
4. Responsive typography: Use relative units like 'em' or 'rem' for font sizes to ensure text scales appropriately across different devices.
5. Viewport meta tag: Include the viewport meta tag in your HTML to control the layout on mobile browsers.
Utilising breakpoints and media queries
Breakpoints are the points at which your design changes to accommodate different screen sizes. Media queries are used to apply CSS rules based on these breakpoints.
Here's how you can implement breakpoints and media queries in your Drupal theme:
1. Define breakpoints in your theme:
Create a 'panda.breakpoints.yml' file in your theme’s root directory to define your breakpoints.
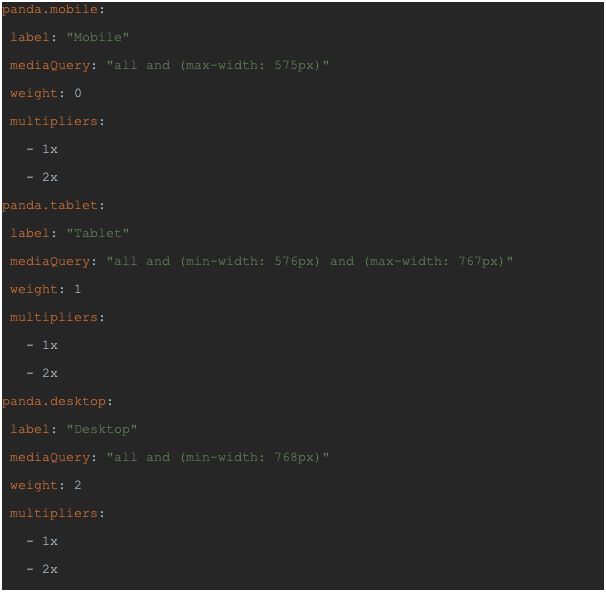
Once you set the above up, you can then create responsive image styles based on these breakpoints from within the Drupal backend UI.
2. Use media queries in CSS:
In your CSS files, use media queries to apply styles based on the defined breakpoints. Here are some examples:
By following these techniques and utilising breakpoints and media queries, you can create a responsive Drupal theme that provides an optimal viewing experience across a wide range of devices and screen sizes. This approach ensures your website is accessible, user-friendly, and visually appealing, regardless of how visitors access it.
Best practices for Drupal theming
Writing clean, maintainable, and reusable Code
Writing clean, maintainable, and reusable code is essential for efficient Drupal theming. Here are some best practices:
1. Follow coding standards: Adhere to Drupal’s coding for PHP, CSS, and JavaScript. This ensures consistency and makes your code easier to read and maintain.
2. Modular design: Break your theme into smaller, reusable components. Use separate files for different CSS and JS functionalities, and organise them logically. This makes it easier to manage and update your theme.
3. Clear naming conventions: Use clear and descriptive names for your classes, IDs, and variables. This improves readability and helps future developers understand the purpose of each element.
4. Avoid inline styles: Keep styles and scripts in separate CSS and JS files. This improves maintainability and allows for better caching and performance optimization.
5. Use preprocessors: Consider using CSS preprocessors like to write more maintainable and extendable CSS. They allow you to use variables, nested rules, and mixins, making your stylesheets more efficient.
Staying up-to-date with community standards
Staying current with community standards and best practices ensures your theme remains compatible and secure:
1. Follow Drupal announcements: Keep an eye on the Drupal.org website for updates, security advisories, and new best practices. Subscribe to relevant newsletters or forums to stay informed by going to the “Account” tab in your drupal.org account.
2. Engage with the community: Participate in Drupal community events, forums, and groups. Engaging with other developers helps you learn new techniques and stay updated with the latest trends.
3. Review contributed themes: Look at popular contributed themes to see how they implement best practices. This can provide valuable insights and inspiration for your own themes.
4. Use version control: Implement version control systems like Git to track changes in your codebase. This allows you to manage updates efficiently and collaborate with other developers seamlessly.
Documenting your work for future developers
Good documentation is crucial for the maintainability and scalability of your theme. It ensures that future developers can understand and work with your codebase effectively:
1. Comment your code: Add meaningful comments to explain the purpose of complex code blocks, especially preprocess functions, template overrides, and custom logic. This helps other developers understand the intent behind your code.
2. Create a README file: Include a README.md file in your theme directory. This should provide an overview of your theme, installation instructions, dependencies, and any special configuration steps. It serves as a quick reference guide for anyone working on the theme.
3. Use inline documentation tools: Consider using tools like JSDoc or PHPDoc to generate documentation directly from your code comments. This provides a standardised way to document functions, parameters, and return values.
By following these best practices, you can ensure that your Drupal theme is well-structured, maintainable, and easy to understand, making it easier for future developers to work with and build upon your work.
Tips for debugging Drupal themes

Tools and methods for theme debugging
Effective debugging is essential for developing and maintaining Drupal themes. Here are some tools and methods to help you debug your Drupal themes:
1. Twig debugging: Enable Twig debugging, as explained before, to get detailed information about the templates being used, their suggestions, and the variables available in each template.
2. Browser developer tools: Use the built-in developer tools in browsers like Chrome Dev , Firefox , and Safari Web Development to inspect HTML, CSS, and JavaScript. These tools allow you to view the DOM structure, examine styles, and debug scripts.
3. Devel module: Install the Devel to access a suite of developer tools, including variable dump functions, query logs, and performance monitoring.
4. Xdebug: Use with your PHP development environment to step through code, set breakpoints, and analyse stack traces. This is particularly useful for debugging preprocess functions and custom PHP code. Setting up Xdebug will vary depending on your development environment, but here is a good starting .
5. Watchdog logging: Use Drupal's 'watchdog()' function to log custom messages to the Drupal log. This can help you track down issues in preprocess functions and other PHP code.
Common issues and how to solve them
Here are some common theming issues in Drupal and tips on how to solve them:
1. Template not being used: If your custom template is not being used, ensure that:
- The template file is named correctly according to Drupal's naming conventions.
- Twig debugging is enabled to verify template suggestions.
- The cache is cleared after adding or modifying templates.
2. CSS or JS not loading: If your CSS or JS files are not loading:
- Check your '.libraries.yml' file for correct syntax and paths.
- Ensure the libraries are attached in your '.info.yml' file or via 'attach_library' in your Twig templates.
- Clear Drupal's cache to ensure changes take effect.
3. Variable not available in template: If a variable is not available in your template:
- Use Twig debugging to inspect available variables.
- Ensure the variable is being correctly added in the relevant preprocess function.
- Verify that your preprocess function is named and implemented correctly.
4. Responsive design issues: If your theme is not displaying correctly on different devices:
- Verify your breakpoints in the '.breakpoints.yml' file.
- Ensure media queries in your CSS are correctly defined and applied.
- Test your site on multiple devices and use browser developer tools to simulate different screen sizes.
Leveraging Drupal's built-in debugging features
Drupal provides several built-in features to assist with debugging:
1. Twig debugging: As explained before, enable Twig debugging.
2. Drupal error reporting: Configure error reporting to display all errors, warnings, and notices. This can be set in 'sites/default/settings.php':
3. Status report: Regularly check the Status Report page ('/admin/reports/status') for any issues related to your Drupal installation. This page provides information on missing updates, configuration issues, and system performance.
4. Database logging: Use the Database Logging module ('dblog') to view detailed logs of all system events, including PHP errors, database queries, and user activities. This can be accessed at '/admin/reports/dblog'.
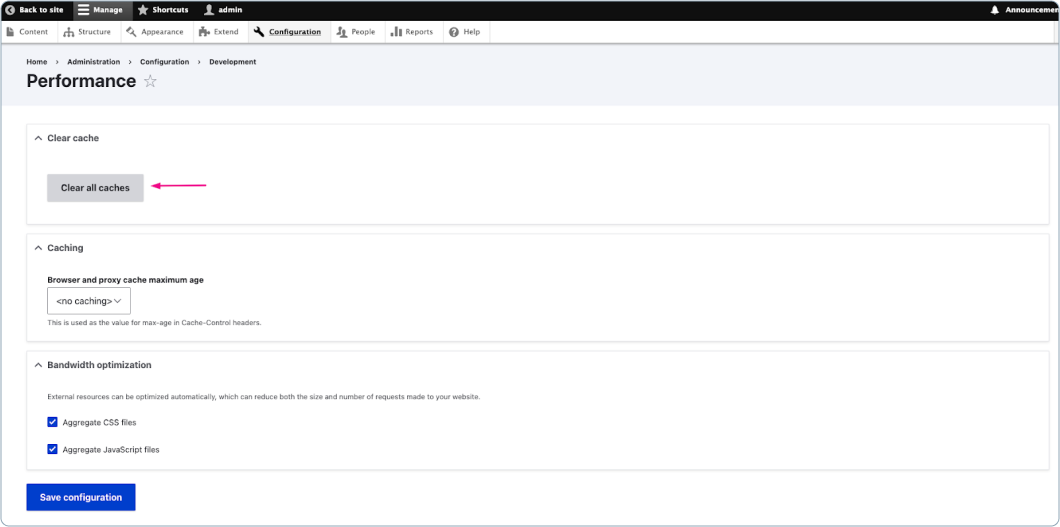
5. Cache clearing: Always clear Drupal’s cache after making changes to templates, libraries, or configurations to ensure that your changes are applied. You can clear the cache from the admin interface at '/admin/config/development/performance' or using Drush with the command 'drush cr'.
By leveraging these tools and techniques, you can efficiently debug and resolve issues in your Drupal themes, ensuring a smooth development process and a high-quality end product.
Drupal theme optimization for performance
Importance of a high-performance website
A high-performance website is crucial for providing a positive user experience, improving search engine rankings, and increasing user engagement. Slow load times can lead to higher bounce rates, reduced conversions, and a negative perception of your brand. Therefore, optimising your Drupal theme for performance is essential to ensure your site is fast, responsive, and efficient.
Techniques to reduce load times and optimise rendering
1. Optimise images: Use appropriately sized images and compress them to reduce file sizes. Implement responsive images using the 'picture' element and 'srcset' attribute.
2. Minify and aggregate CSS and JS: Minify CSS and JavaScript files to remove unnecessary whitespace and comments, reducing file sizes. Drupal can aggregate these files to reduce the number of HTTP requests. Enable aggregation in the Performance settings at '/admin/config/development/performance'.
3. Use a Content Delivery Network (CDN): A CDN distributes your site's static assets across multiple servers worldwide, reducing latency and improving load times for users regardless of their location.
4. Enable caching: Drupal has robust and sophisticated caching mechanisms to store rendered pages and assets, reducing the need for repeated database queries and processing. Enable page caching and block caching in the Performance settings at '/admin/config/development/performance'. Use the 'cache' tags in your Twig templates to control caching behaviour.
5. Defer non-critical JavaScript: Load non-essential JavaScript files asynchronously or defer them until after the main content is loaded. This can be specified in your '.libraries.yml' file:

6. Optimise CSS delivery: Inline critical CSS to render above-the-fold content quickly and defer the loading of non-critical CSS. Drupal modules like Critical CSS can help extract critical CSS.
7. Reduce HTTP requests: Where possible, combine multiple CSS and JS files into single files. Limit the use of web fonts and third-party scripts, which can add additional HTTP requests and slow down page load times.
8. Leverage browser caching: Set appropriate cache headers for static assets to instruct browsers to cache them locally. This reduces the need to download the same resources on subsequent visits.
Tools for measuring and improving theme performance
1. Google PageSpeed : Analyses your website and provides suggestions to improve performance. It measures performance on both mobile and desktop devices, giving a comprehensive view of your site's speed.
2. : Offers detailed insights into your site's performance, including page load time, total page size, and the number of requests. It also provides actionable recommendations to optimise your site.
3. : A free tool that allows you to run detailed performance tests from multiple locations around the world. It provides a wealth of data, including load time, rendering times, and suggestions for improvement.
4. Drupal's performance monitoring : Use tools such as New integration to monitor and analyse your site's performance in real time.
5. Browser developer tools: As mentioned before, built-in tools in browsers like Chrome and Firefox offer performance analysis features. Use the Network tab to monitor resource loading and the Performance tab to analyse rendering, scripting, and layout times.
By implementing these techniques and using these tools, you can significantly optimise your Drupal theme for performance, ensuring a fast, responsive, and user-friendly website. This not only enhances user satisfaction but also improves your site's search engine rankings and overall effectiveness.
Drupal accessibility features in theming
Overview of web accessibility standards
Web accessibility ensures that websites are usable by people with disabilities and also those without disabilities but who may have external limitations (such as older phones). Adhering to accessibility standards not only improves user experience but is also often required by law.
Key standards include (but are not limited to):
1. WCAG (Web Content Accessibility : Developed by the W3C, WCAG provides a comprehensive set of guidelines for making web content more accessible. The guidelines are organised around four : Perceivable, Operable, Understandable, and Robust. WCAG has different levels of compliance: A, AA, and AAA.
2. ARIA (Accessible Rich Internet : A set of attributes that make web content and web applications more accessible to people with disabilities, especially those who rely on assistive technologies.
How to incorporate accessibility features into your theme
1. Semantic : Use semantic HTML elements (like '<header>', '<nav>', '<main>', '<article>', '<section>', and '<footer>') to define the structure of your content. This helps assistive technologies understand and navigate the content better.
2. ARIA roles and : Use ARIA roles, properties, and states to enhance the accessibility of web content. For example, use 'role="navigation"' for navigation elements and 'aria-live="polite"' for dynamically updating content.
3. Keyboard : Ensure that all interactive elements are accessible via keyboard. Use appropriate focus styles to make navigation clear and visible.
4. Colour : Ensure that the colour contrast between the text and its background is sufficient. WCAG recommends a contrast ratio of at least 4.5:1 for normal text and 3:1 for large text.
5. Alt text for : Provide descriptive alt text for all images. This helps screen readers convey the content of images to visually impaired users.
6. : Label all form elements clearly and associate labels with their corresponding inputs using the 'for' attribute. Provide error messages and instructions that are clear and accessible.
7. Responsive : Ensure that your site is responsive and works well on various devices, including mobile phones and tablets. This benefits all users, including those with disabilities.
8. Skip : Implement skip links to allow users to bypass repetitive navigation and go straight to the main content.
9. Drupal modules for accessibility: Use Drupal modules designed to enhance accessibility, such as the Automatic Alternative and CKEditor Accessibility .
Testing for accessibility compliance
1. Automated testing tools: Use automated tools to identify common accessibility issues. Tools like , , and can provide a quick assessment of your site's accessibility.
2. Screen reader testing: Test your site using screen readers like , , or to ensure that it is navigable and understandable.
3. Keyboard testing: Navigate your site using only the keyboard to ensure that all interactive elements are accessible and focusable.
4. Colour contrast analysers: Use tools like the Colour Contrast or Chrome to check the contrast ratio of your text and background colours.
5. Manual testing: Conduct manual testing to identify issues that automated tools might miss. This includes checking the readability of text, the clarity of instructions, and the usability of forms.
6. User testing: Engage users with disabilities to test your site and provide feedback. This real-world testing can uncover issues that other testing methods might not reveal.
By incorporating these accessibility features and thoroughly testing your Drupal theme for compliance, you can create an inclusive and user-friendly website that meets the needs of all users, regardless of their abilities. This not only enhances the user experience but also helps you comply with legal and regulatory requirements.
Integrating third-party libraries into Drupal themes
Balancing functionality with performance while using third-party assets
When integrating third-party libraries, it’s important to balance added functionality with performance considerations:
1. Minimise file sizes: Use minified versions of CSS and JS files to reduce load times. This minimises the impact on performance while still providing the necessary functionality.
2. Lazy loading: Implement lazy loading for scripts that are not immediately needed by using “async” or “defer”. This can improve initial page load times by deferring the loading of non-critical assets.
3. Conditional loading: Only load libraries on pages where they are needed. This reduces the overall resource load on the site and improves performance.
4. Use CDNs: Leverage Content Delivery Networks (CDNs) to serve third-party assets. CDNs can deliver assets more quickly to users based on their geographical location.
5. Combine and aggregate: Where possible, combine multiple CSS and JS files into single files and enable Drupal’s built-in aggregation settings to minimise HTTP requests.
6. Self-host libraries: If possible, it’s ideal to self-host external libraries so that users have to make one less HTTP request to an external domain.
Handling compatibility and updates for libraries
Maintaining compatibility and handling updates for third-party libraries is crucial to ensure the stability and security of your Drupal site:
1. Monitor library versions: Keep track of the versions of the third-party libraries you are using. Regularly check for updates and security patches from the library maintainers. Consider signing up for the library’s newsletter if it exists or subscribing to the Git repository so that you are alerted of new releases.
2. Test before updating: Before updating any third-party libraries, test the new version in a development environment to ensure it doesn’t break your site or introduce new issues.
3. Use dependency management tools: Tools like Composer can help manage dependencies and ensure that you are using compatible versions of libraries.
4. Document dependencies: Clearly document the third-party libraries and frameworks used in your theme, including their versions and sources. This helps future developers understand what is being used and why.
5. Fallback strategies: Implement fallback strategies in case a third-party library fails to load. This can include hosting critical libraries locally as a backup to the CDN version.
By following these practices, you can effectively integrate third-party libraries into your Drupal theme, enhancing functionality while maintaining performance and compatibility. This approach ensures your site remains fast, secure, and maintainable.
Drupal theming security considerations

Understanding potential security risks in theming
When theming in Drupal, there are several security risks to be aware of. These include:
1. Cross-site scripting (XSS): This occurs when malicious scripts are injected into web pages viewed by other users. For example, if user-generated content is not properly sanitised, it can lead to XSS attacks.
2. Cross-Site Request Forgery (CSRF): This happens when unauthorised commands are transmitted from a user that the web application trusts. Improperly handled forms and AJAX requests can make your site vulnerable to CSRF attacks.
3. Insecure direct object references: Allowing users to access objects directly by manipulating URLs or forms can expose sensitive data. For instance, if user profile IDs are exposed in URLs without proper access controls, it can lead to unauthorised data access.
4. Data leakage: Sensitive data can be exposed if not properly handled in templates. For example, displaying raw user data without sanitization can lead to data breaches.
Methods to ensure your theme's security
1. Use secure default behaviours: Drupal’s Twig templates automatically escape variables by default. That means that every string printed from a Twig template (anything between ) gets .
2. Implement CSRF protection: Use Drupal’s built-in CSRF protection mechanisms for forms and AJAX requests. See here for more .
4. Should I validate and sanitise inputs?: Doing things the Drupal way means storing input as is and validating/sanitising only when outputted. Here’s .
5. Least privilege principle: Ensure that users have the minimum permissions necessary to perform their tasks. Regularly review and update user roles and permissions.
Adhering to Drupal's secure coding standards
1. Follow Drupal coding standards: Adhere to Drupal’s secure coding standards to minimise security risks. These standards cover best practices for PHP, JavaScript, and CSS coding. Refer to the Drupal Coding for detailed guidelines.
2. Use the security review module: Install and run the Security module to scan your site for common security issues and vulnerabilities.
3. Regular updates: Keep your Drupal core, modules, and themes up to date with the latest security patches. Regularly check for updates and apply them promptly. Ideally, you should update Drupal core as soon as critical updates have been released, especially if your site handles sensitive data.
Separating business logic from presentation logic
1. Separation of concerns: Maintain a clear separation between business logic and presentation logic. Business logic should reside in custom modules, while themes should handle the presentation layer.
2. Avoid PHP in templates: Do not include PHP logic directly in Twig templates. Use preprocess functions in your theme or custom modules to prepare variables for templates.
3. Use preprocess functions: Use preprocess functions to add or modify variables before they are passed to templates. This keeps your templates clean and focused on presentation.
4. Keep configuration in modules: Configuration settings and business rules should be managed through custom modules, not themes. This includes things like access controls, data validation, and processing logic.
5. Use secure methods: Always use Drupal’s secure methods and functions for database queries, form handling, and other backend processes. This ensures consistency and reduces the risk of security vulnerabilities.
By understanding potential security risks, implementing robust security measures, adhering to coding standards, and maintaining a clear separation of concerns, you can ensure that your Drupal themes are secure and maintainable. This approach helps protect your site from common vulnerabilities and provides a solid foundation for future development.
Theme settings and configuration options
Providing customisable options through theme settings
Customisable theme settings allow site administrators to configure aspects of the theme without altering the code. This flexibility enables non-developers to make changes to the site's appearance and functionality directly from the Drupal admin interface.
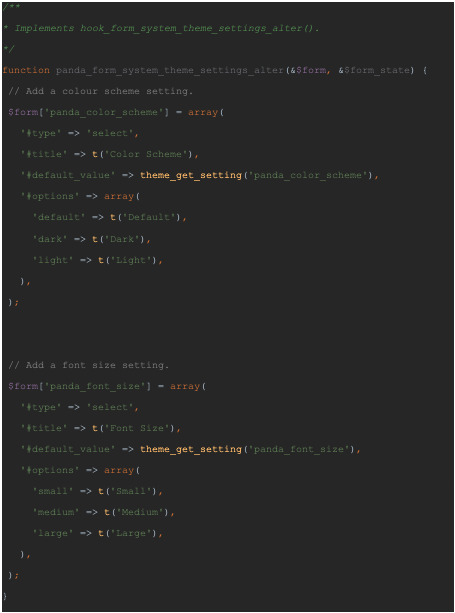
1. Define theme settings: Theme settings can be defined in the theme’s 'theme-settings.php' file or in your ‘THEMENAME.theme’ file. This file specifies the options available for customization, such as colour schemes, font choices, and layout configurations.
2. Create a form for settings: Use the 'hook_form_system_theme_settings_alter()' function to add settings to the theme’s configuration form. This form appears in the Drupal admin interface under Appearance > Settings.
Example:
Managing theme settings with Drupal's configuration API
Drupal’s Configuration API allows you to store and manage theme settings in a consistent and reliable way.
1. Storing configuration: Use the 'theme_get_setting()' function to retrieve the value of a theme setting. This function reads from the theme’s configuration.
2. Updating configuration: To update a theme setting, use the Configuration API’s 'set()' and 'save()' methods.
Example:

3. Default Settings: In order to set the default value for any form element you add, you’ll need to add a config/install/THEME.settings.yml file with a simple line: SETTING_NAME: DEFAULT_VALUE.
For our panda theme, you’d need to edit the panda/config/install/panda.settings.yml file and add these lines:

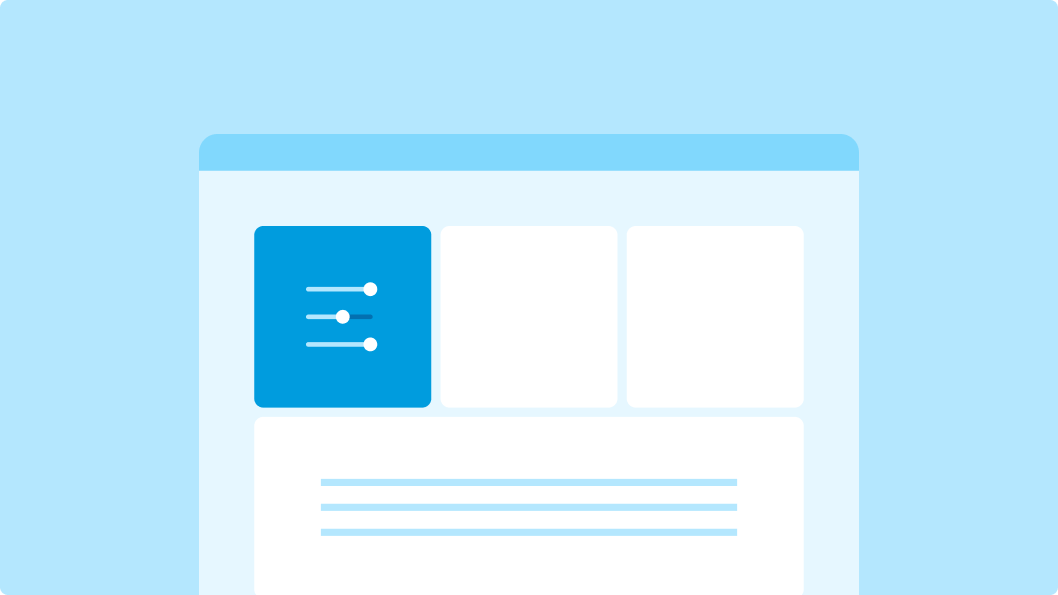
User interface considerations for theme settings
When designing the user interface for theme settings, consider the following:
1. Clarity and simplicity: Ensure that settings are clearly labelled and easy to understand. Use descriptive titles and help text to guide users.
2. Group related settings: Organise settings into logical groups or sections. This helps users find and adjust settings more efficiently.
3. Use appropriate input elements: Choose the right input elements for each setting. For example, use select lists for predefined options, text fields for free-form input, and checkboxes for binary choices.
4. Provide live previews: If possible, provide a live preview of changes. This allows users to see the impact of their adjustments in real-time, improving the user experience.
5. Accessibility: Ensure that the settings form is accessible to all users, including those using assistive technologies. Use standard Drupal form elements and follow best practices for accessible design.
By providing customizable options through theme settings, managing these settings with the Configuration API, and considering user interface design, you can create a flexible and user-friendly Drupal theme. This empowers site administrators to tailor the theme to their specific needs without requiring technical expertise.
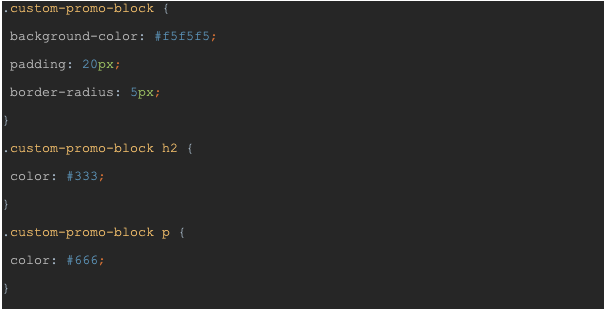
Custom block types and theming
Creating and styling custom block types in your theme
Custom block types allow you to create reusable content components that can be styled and managed within your theme. Here’s how to create and style custom block types in Drupal:
1. Create a custom block type:
- Navigate to Structure > Block layout > Custom block library
- Click Add custom block type.
- Enter a label for your block type and click Save.
2. Add fields to the block type:
- After creating the block type, click Manage fields.
- Add fields to your block type as needed (e.g., text, images, links).
3. Create a custom block:
- Go to Structure > Block layout > Custom block library
- Click Add custom block and select your custom block type.
- Fill in the fields and save the block.
4. Style the custom block:
- Create a Twig template for your custom block type. The naming convention for the template file is 'block--BLOCK-TYPE-ID.html.twig'.
- Place this file in your theme’s 'templates' folder.
Example:
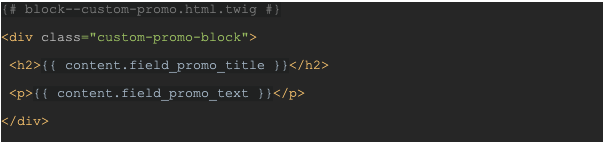
- Add CSS to style the block in your theme’s stylesheet:
Positioning and managing blocks throughout the theme
1. Place blocks in regions:
- Navigate to Structure > Block layout
- Assign blocks to regions by clicking “Place block” in the desired region.
- Select the block you want to place and configure its visibility settings.
2. Configure block visibility:
- Set visibility conditions for blocks based on content types, user roles, pages, etc.
- This ensures blocks appear only where needed, improving performance and user experience.
3. Use layout builder:
- Enable the Layout Builder module to create and manage complex layouts with custom blocks.
- Navigate to Structure > Content types and enable Layout Builder for specific content types.
- Customise layouts by adding sections and placing blocks within them.
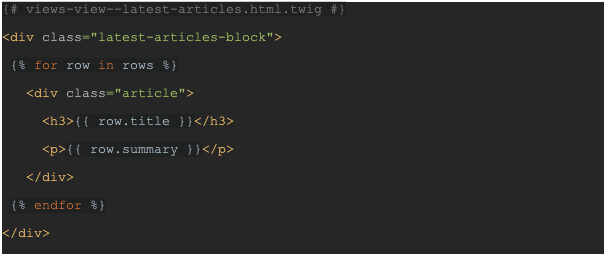
Techniques for dynamic data presentation
1. Use views to create dynamic blocks:
- Create a view that outputs content in a block.
- Navigate to Structure > Views > Add new view
- Configure the view to display content dynamically based on filters, sorting, and other criteria.
- Save the view and place the resulting block in a region.
Example:
2. Use contextual filters:
- Add contextual filters to views to display content based on dynamic parameters (e.g., current user, URL arguments).
- This allows you to tailor content presentation based on context, providing a personalised experience.
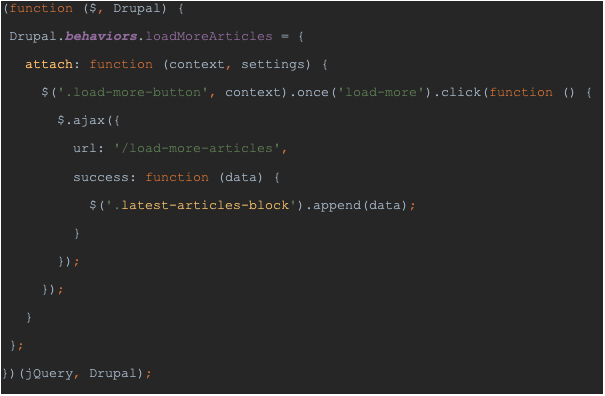
3. Leverage JavaScript for dynamic interactions:
- Use JavaScript to enhance the interactivity of your blocks.
- For example, you can load additional content via AJAX when a user interacts with a block.
Example:
By creating and styling custom block types, effectively positioning and managing blocks, and utilising techniques for dynamic data presentation, you can enhance the flexibility and functionality of your Drupal theme. This approach ensures that your site is both visually appealing and highly adaptable to various content needs.
Theming forms in Drupal
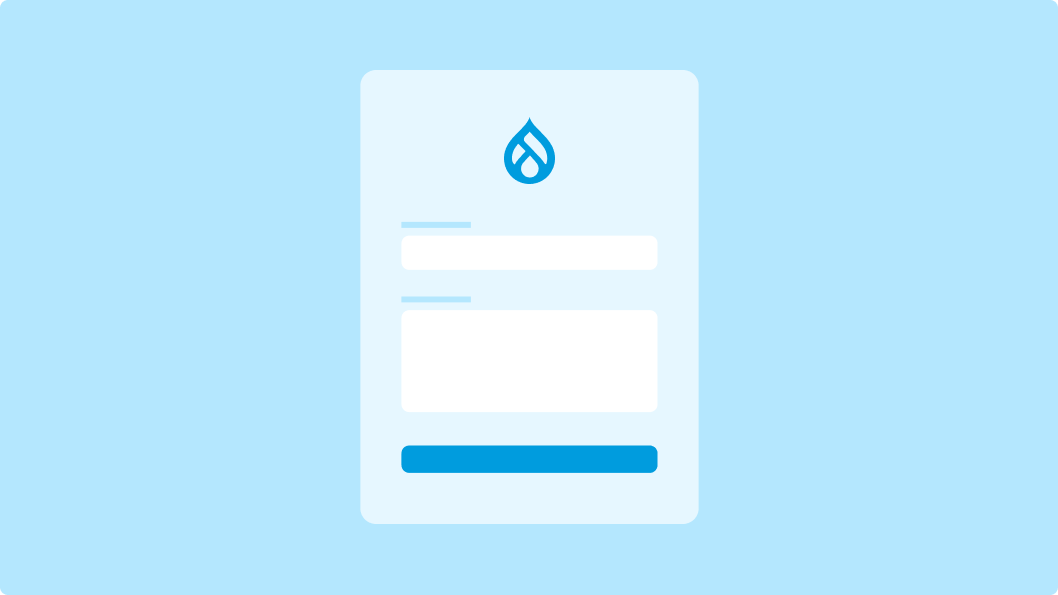
Customising form elements for a cohesive design
Customising form elements is essential for maintaining a consistent look and feel across your Drupal site. Here’s how to customise form elements:
1. Use form API: Drupal’s Form allows you to alter form elements programmatically.
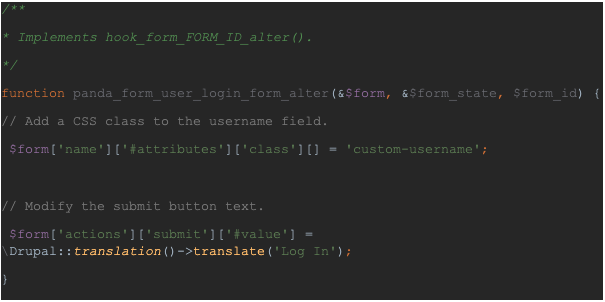
2. Create a form alter hook: Use or hook_form_FORM_ID_alter() to customise specific forms.
Example:
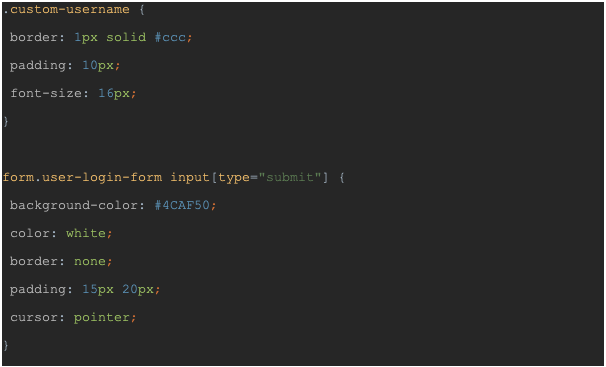
3. Add custom classes and attributes: Use the Form API to add custom classes and attributes to form elements, making them easier to style with CSS.
4. Custom CSS: Write custom CSS to style the form elements, ensuring they match the overall design of your theme.
Example:
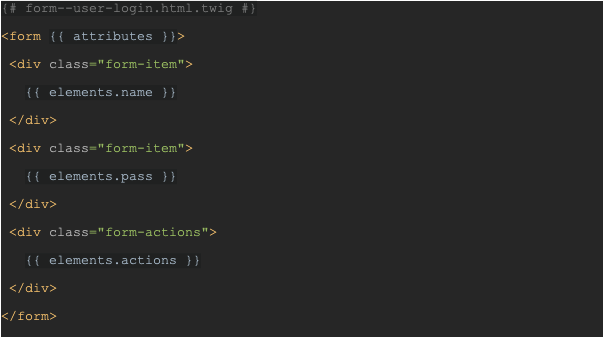
Altering and extending form templates
1. Identify the form template: Use Twig debugging to identify the template used by a form.
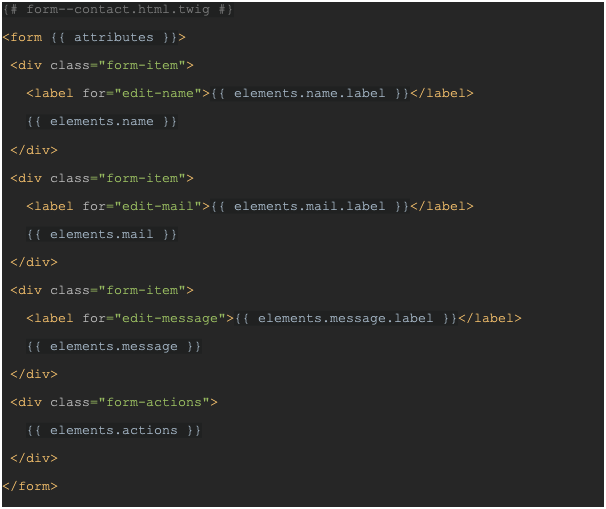
2. Override the form template: Copy the form template from the core or module directory to your theme’s 'templates' directory.
Example:
docroot/web/themes/custom/panda/templates/form--user-login.html.twig
3. Modify the template: Customise the template as needed. Add custom classes, wrappers, or change the structure to fit your theme’s design.
Example:
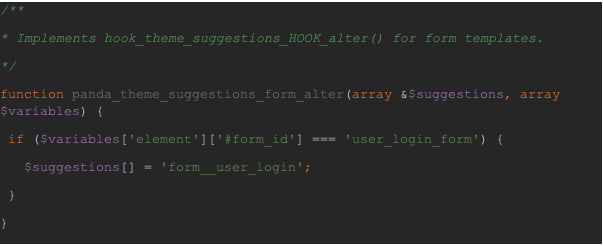
4. Use 'hook_theme_suggestions_HOOK_alter()': Create theme suggestions to target specific forms or conditions.
Example:
User experience improvements with themed forms
1. Improve accessibility: Ensure form elements are by providing clear labels, error messages, and instructions. Use ARIA attributes where necessary.
Example:
2. Enhance usability: Add placeholder text, tooltips, and inline validation to guide users through form completion.
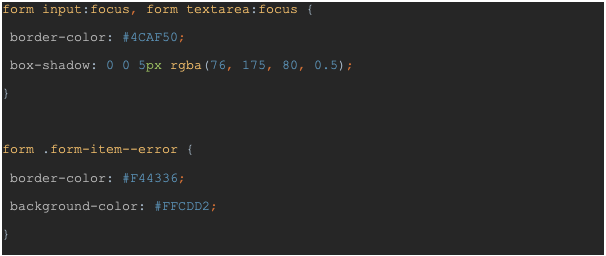
3. Provide visual feedback: Use CSS to provide visual feedback on form interactions, such as highlighting fields on focus and indicating errors.
Example:
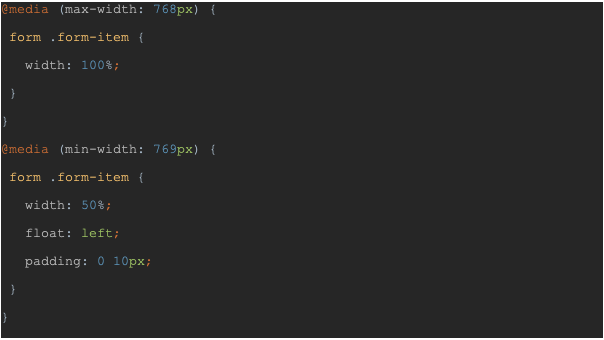
4. Responsive design: Ensure forms are responsive and look good on all devices. Use media queries to adjust form element sizes and layouts for different screen widths.
Example:
By customising form elements, altering and extending form templates, and focusing on user experience improvements, you can create cohesive and user-friendly forms that enhance the overall design and functionality of your Drupal theme. This approach ensures that your forms are not only visually appealing but also accessible and easy to use.
Multilingual theming for Drupal sites

Challenges and solutions for multilingual theming
Creating a multilingual Drupal site involves several challenges which can be addressed (listed below). Each challenge can be addressed using various Drupal solutions some of which come out-of-the-box with Drupal:
1. Content translation: Ensuring all content is translated accurately and consistently across different languages. Drupal provides robust multilingual support out of the box. Enable the necessary modules and configure language settings.
2. Interface translation: Translating the user interface elements such as menus, buttons, and form labels. Use tools and workflows to manage translations efficiently. This includes translation review and approval processes.
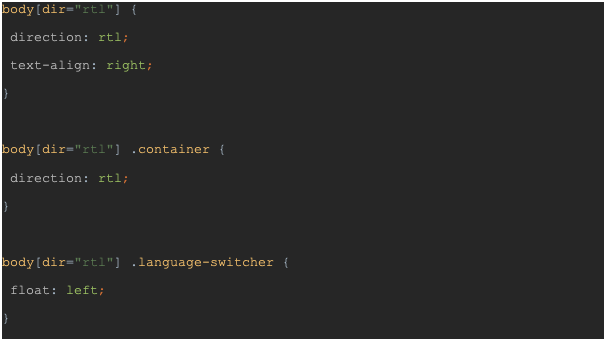
3. Right-to-Left (RTL) languages: Supporting languages that are read from right to left, such as Arabic and Hebrew. Ensure your theme supports RTL languages by using appropriate CSS and testing with RTL content.
4. Consistency in design: Maintaining a consistent design and user experience across all languages. Use the same design elements, fonts, and layout structures across all language versions of the site. Ensure that your CSS and JS work consistently in all languages.
Example CSS:
Ensuring a consistent experience across languages
1. Unified theme structure: Use a single theme with language-specific overrides rather than creating separate themes for each language. This ensures design consistency.
2. Language switcher: Provide a clear and accessible language switcher that allows users to switch between languages easily.
The Drupal modules for managing translations
Drupal 10 offers several modules to help manage translations and ensure a consistent multilingual experience:
1. Language module (from Drupal core): Adds language support to your site. It allows you to define which languages are available and set a default language.
2. Content translation module (from Drupal core): Allows you to translate content entities, such as nodes and blocks.
3. Locale (Interface translation) module (from Drupal core): Provides tools for translating the user interface.
4. Configuration translation module (from Drupal core): Enables translation of configuration entities, such as views, fields, and content types.
5. Admin toolbar content language : Extends the admin toolbar with language-specific options, making it easier to manage translations from the admin interface.
By leveraging these modules, you can effectively manage translations and provide a consistent multilingual experience on your Drupal site. This ensures that users have a seamless and intuitive experience, regardless of the language they choose to use.
Updating and maintaining custom drupal themes
Best practices for applying and testing updates
1. Version control: Use a version control system like Git to manage changes to your theme. This allows you to track modifications, revert to previous versions if necessary, and collaborate with other developers.
2. Local development environment: Set up a local development environment to test updates before applying them to the live site. Tools like , or can help create consistent and replicable development environments.
3. Backup before updates: Always backup your site, including the database and files, before applying any updates. This ensures you can restore the site if something goes wrong.
4. Use a staging environment: Apply updates in a staging environment first. This environment should replicate the live site as closely as possible, allowing you to catch issues before they affect users.
5. Test thoroughly: After applying updates, thoroughly test your theme and site functionality. Check key pages, forms, and custom features to ensure everything works as expected.
6. Review change logs: Check the change logs and release notes for Drupal core and contributed modules/themes. This can alert you to any changes that might affect your theme.
7. Automated testing: Implement automated testing using tools like Behat, PHPUnit, or . Automated tests can quickly identify regressions and ensure your site functions as expected after updates.
Keeping your theme compatible with Drupal core updates
1. Follow Drupal coding standards: Adhering to Drupal coding ensures that your theme is compatible with core updates and follows best practices.
2. Use stable APIs: Where possible, use stable APIs and avoid deprecated functions. This reduces the risk of your theme breaking due to changes in Drupal core.
3. Monitor deprecation notices: Pay attention to deprecation notices in Drupal’s watchdog logs. Update your theme code to replace deprecated functions and APIs before they are removed in future versions of Drupal core.
4. Stay informed: Follow the Drupal community and core development progress. Subscribe to newsletters, follow Drupal.org, and participate in community discussions to stay informed about upcoming changes.
5. Modular design: Keep your theme modular by separating custom functionality into sub-themes or custom modules. This makes it easier to update and maintain specific parts of your theme without affecting the whole site.
6. Regular updates: Regularly update your theme to keep it in sync with the latest Drupal core and module updates. This prevents a backlog of updates and reduces the risk of compatibility issues.
The lifecycle of a custom theme and ongoing maintenance
1. Initial development:
Planning and Design: Define the requirements and design for your theme. Create mockups and wireframes to visualise the layout and features.
Development: Build the theme according to the design specifications. Follow best practices for clean and maintainable code.
Testing: Thoroughly test the theme across different browsers and devices. Ensure accessibility and performance standards are met.
2. Launch:
Deployment: Deploy the theme to the live site. Ensure all configurations are properly set up.
Monitoring: Monitor the site for any issues post-launch. Use analytics and logging tools to track performance and user behaviour.
3. Ongoing maintenance:
Updates: Regularly apply updates to Drupal core, contributed modules, and your custom theme. Follow best practices for testing and deployment.
Bug fixes: Address any bugs or issues that arise. Use issue tracking tools to manage and prioritise bug fixes.
Improvements: Continuously improve the theme based on user feedback and evolving design trends. Add new features and enhancements as needed.
Documentation: Maintain comprehensive documentation for your theme, including setup instructions, customisation options, and developer notes. This aids future development and maintenance efforts.
4. End of life:
Evaluation: Periodically evaluate the theme to determine if it still meets the needs of the site and its users.
Retirement: If the theme is no longer suitable, plan for its retirement. This may involve designing and developing a new theme or migrating to a different solution.
Conclusion
Creating a custom Drupal theme is essential for crafting a unique and functional website tailored to your specific needs. By setting up a solid development environment, understanding theme structure, customising forms, and ensuring accessibility, you can build a cohesive and high-performing site. Adhering to best practices for performance optimization, multilingual support, and security ensures your theme remains robust and adaptable.
The benefits of developing a custom Drupal theme are significant. It allows for unique branding, enhanced usability, and the implementation of advanced features that off-the-shelf themes may not support. This customization is crucial for businesses aiming to create a distinctive online presence that aligns with their brand identity and meets the needs of their audience.
Investing in a custom Drupal theme provides a foundation for a scalable and maintainable website that can grow with your business. Leveraging Drupal's flexibility and power, you can deliver a tailored user experience that engages users and helps achieve your strategic goals. A well-crafted custom theme ensures your site remains competitive, user-friendly, and aligned with the latest trends and technological advancements.